
Preview Stage
1. Interface Overview
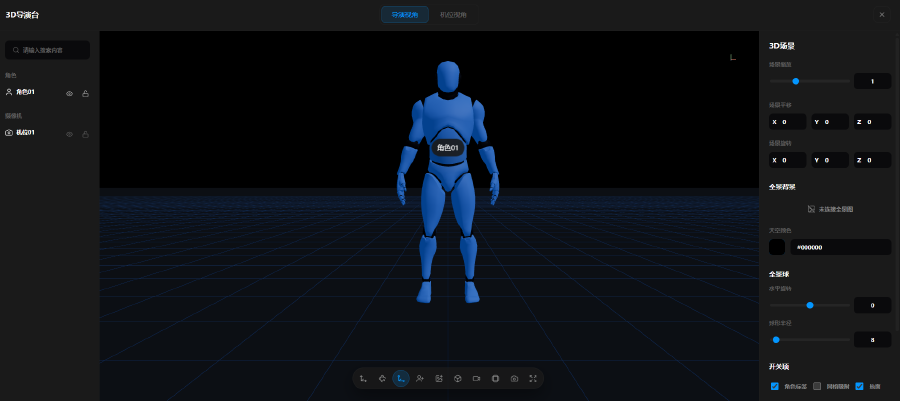
1. Top View Switcher
- Director view: Global god-view. Freely drag and rotate the full 3D scene, adjust spatial positions of characters, objects, and cameras—used for overall scene layout and blocking
- Camera view: Simulates the final filmed frame in real time. This view determines final composition and camera movement and is the basis for rendered output. It is also required before using camera capture
- Record: New top-bar recording entry. Capture a dynamic preview and export a white-model clip with character blocking and camera movement
2. Left Sidebar
Character list: Manage all added character mannequins
- Click the eye icon to hide/show characters; lock characters to prevent accidental moves
- Rename characters to distinguish cast members
- With a character selected, fine-tune pose and motion paths in the right panel
Camera list:
- Create unlimited independent cameras (Camera 01, Camera 02, …), each with isolated parameters and capture data
- Show/hide, lock, and quickly switch between cameras
Top search box: Quickly find cameras or characters in large productions
Bottom timeline: Arrange character motion, camera moves, and shot-change timing. Set clip duration, add keyframes, draw character paths and camera tracks; play back the full dynamic preview and adjust action speed and cut points.
3. Right Properties Panel
3.1 Director View
Scene XYZ scale/translate/rotate, panoramic background upload, solid-color sky, panoramic sphere radius and rotation, label / grid visibility toggles.
3.2 Camera View
① Basic camera parameters
- Camera name, dropdown to switch cameras
- Camera XYZ position
- Look-at target (manual coordinates / follow character), look-at coordinates (fixed Y=1.05 for chest-level eye line)
- Field of view (FOV) / focal length (default 50; controls wide vs telephoto perspective)
② Camera capture
Current camera capture thumbnail: after clicking the bottom camera button, a preview of the framed shot appears so you can verify composition.
Thumbnail actions:
- Delete: Discard the current capture and reshoot
- Export to canvas (checkmark): Push the camera snapshot to the editing canvas
- Eye icon: Temporarily hide the preview
4. Bottom Toolbar
- Move tool: 3D spatial translation
- Rotate tool: 3-axis rotation
- Scale tool: Resize characters and props
- Add character mannequin: Multiple body types, crowd batches, geometric props
- Import panoramic image: Build a 360° environment background
- Import local 3D model: External furniture, architecture, and set dressing
- Add camera: Create a new shooting camera
- Aspect ratio: Lock 9:16 vertical / 16:9 horizontal / cinematic widescreen, etc.
- Current-view capture: Capture the live camera view immediately, binding full coordinates and FOV to generate a right-panel thumbnail as a visual storyboard reference
- Fullscreen: Fine-tune camera and character pose with maximum screen space
2. Character Pose Presets
With a character selected in Director view or Camera view, switch to the Pose tab on the right:
- Pose preset library: One-click poses such as standing, T-pose, walking, running, sitting, kneeling, hands on hips, leaning, fighting, waving, looking at phone, and more
- Fine pose sliders: Adjust body lean, turn, tilt, and torso twist numerically. Finalize pose before camera capture for accurate storyboard references
- Motion-path editing: Combined with the bottom timeline, draw a character’s move path and set position/pose at different times for walking, blocking, and interaction. Recording the preview replays the full action
3. Two-View Workflow
Step 1: Director View
- Add character mannequins and plan positions; choose a pose and fine-tune body angles in the right panel
- Upload panoramic backgrounds and import 3D props to build the scene
- Add cameras, place them in space, and lock them to prevent accidental shifts
- Switch to the bottom timeline: draw character motion paths, add camera tracks, and set shot-change times; click play to preview blocking and push/pull/pan/tilt camera moves
Step 2: Camera View
- Switch to Camera view at the top and select the target camera
- Set look-at coordinates and FOV; lock 9:16 vertical at the bottom; drag to fine-tune framing and confirm final composition
Still camera capture:
- Click the bottom camera icon; a dialog confirms the current-view capture and a thumbnail appears in the right capture panel
- Click the checkmark under the thumbnail to export to the canvas. The shot reference lands on the canvas for storyboard placeholders and AI composition guidance
- Repeat for every storyboard camera. Use the left camera list to switch back and restore each camera's parameters and saved capture
Record preview:
- After the timeline’s character actions and camera timing look correct, click Record at the top to capture the full dynamic preview from the current camera view
- When recording finishes, a white-model preview video is sent to a canvas node. It keeps full 3D spatial relationships, character motion, and camera tracks, and can be used as reference for downstream video models to constrain blocking, walk paths, and camera movement